Vermicomposting
Green Gardening Digs Worms
by Lynn Barber / Published January 2016
Vermicomposting is the process of breaking down organic matter into nutrient-rich compost through the use of worms. The worm castings are the end product, which improve soil structure and texture, aerate the soil, increase water holding capacity, and add beneficial nutrients to the soil. Any old (or young) worm just won’t do. Red Wigglers, Eisenia fetida, and Yellow Tails are two of the most popular composting worms. They are favored because they reproduce quickly and consume the most food and bedding (newspapers). Composting worms are good for purposes other than gardening and are ideal bait for fishing and a good food source for birds and small pond fish.
Vermicomposting is an alternative to composting, which involves yard and kitchen waste utilizing a bin or pile outside in the back yard. Worm composting uses a bin also, which can be located on your lanai, front porch, or inside your home as you see fit.
Why would you want to vermicompost? Because worm castings, their waste/manure, is an excellent soil amendment, and you can use it sparingly. Both the bedding for the worms and their castings are nutrient rich. Worm castings can be used as mulch or in a potting soil mixture you create by combining ¼ part of castings, ¼ perlite for aeration, ¼ peat (decomposed plant material) for water holding capacity, and ¼ coarse builders sand for drainage. You can also make worm compost tea by adding water to the castings to water plants on your porch, lanai, or in your landscape. Composting worms aerate the soil, increase water holding capacity, and improve the soil structure and texture.
One pound of composting worms can consume their body weight in food each day. They have five hearts, one brain, and breathe through their skin. The population can double every two to three months in ideal conditions, 60–80 degrees F. Their lifespan is several years.
Composting worms have a few needs, such as temperatures in the 70–80 degree range. Bedding and food are also necessary. The bedding is made from shredded newspaper, but not the glossy advertisements. They have no teeth or eyes and are extremely light sensitive. These worms have a gizzard, like a chicken, where food is digested, and their mouth is in the front section with a protruding lip-like formation that is a food scoop. Worms are externally segmented and do not have a skeleton.
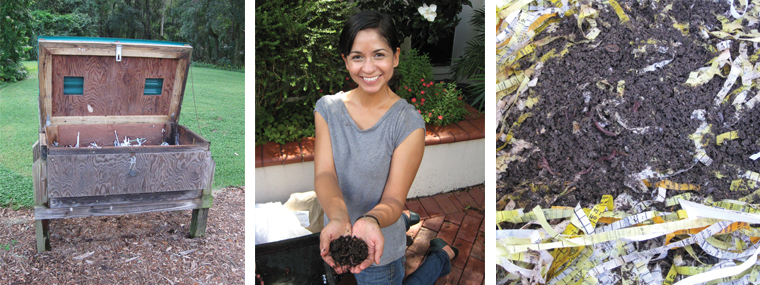
If you are interested in worm/vermicomposting, there are several commercially available worm bins you can purchase online, or you can build your own worm bin. The materials you will need to create a worm bin are as follows:
- One, 14- to 18-gallon plastic container (Make sure the lid fits tightly or the worms may escape.)
- One, 12-in. x 12-in. square of lanai screen
- Duct tape
- Shredded newspaper (no slick ads)
- Distilled water or rain water
- One cup of coarse sand or crushed volcanic rock
- Two pounds of Red Wigglers
- Electric drill with 1-in. spade bit
To prepare the worm bin, drill 10 holes (two per side about four inches from the top of the bin and two in the lid). Do not drill holes in the bottom of the bin because the worm ‘tea’ will leak through. Cut pieces of lanai screen to cover the holes and duct tape the screen over the holes on the inside of the bin. Rip newspaper lengthwise into one inch strips (or shred it) for use as bedding (and a food source for the worms). Moisten the strips of newspaper in water. Wring out the newspaper before adding it to the bin so that it is as moist as a damp (rung out) sponge. Fill the bin two-thirds full with damp newspaper. Spread one cup of sand/crushed volcanic rock on top of the newspaper. Add a small amount of damp, shredded newspaper on top of the sand; then add the worms onto the surface of bedding. Add kitchen scraps. Worms like a variety of food. Their diet includes shredded newspaper, cooked pasta, vegetable and fruit peelings, egg shells, coffee grounds and filters, tea bags (without the staple), bread, and cardboard. Do not feed worms meat, dairy, or fatty foods. Then cover with another small amount of damp, shredded newspaper.
Lynn Barber, Agent
University of Florida/IFAS Extension, Hillsborough County
Lynn Barber, Agent, University of Florida/IFAS Extension, Hillsborough County, is responsible for educating residents on the nine principles of the Florida Friendly Landscaping™ program. These principles include right plant right place, water efficiently, fertilize appropriately, mulch, attract wildlife, manage yard pests responsibly, recycle, reduce stormwater runoff, and protect the waterfront. Barber is past president of the Florida Association of Natural Resource Extension Professionals and has received numerous awards for programming, publications, and television and radio segments. As a Master Gardener, she has given back thousands of hours in environmental horticulture education to the community.

Additional worm care tips: Feeding: One pound of worms can process one pound of kitchen scraps a day. Feed them daily, weekly, or as desired. The smaller the pieces of food, the faster the worms can turn them into castings. Temperature: The ideal temperature for worms is between 60° F and 80° F. Moisture: Check moisture when adding food. If the bedding is too wet, add more bedding. If the bedding is too dry, add water. Darkness: Worms are light sensitive. Place bin in a low light location (e.g., under a sink or in a bathroom with blinds closed, in a shady area, like your lanai or front porch). Use an opaque bin for your worms to decrease the light.
After two or three months, the worms will have recycled the bedding into rich, dark compost/castings. There are several ways you can harvest your worm castings. Here are two ways to harvest the castings:
- Empty all of the contents of the worm bin onto waxed paper. The worms will crawl to the bottom. Scoop the castings off the top.
- Gently push all the contents in the container to one side. On the other side, add moistened bedding and food. After a few days, the worms will migrate to the food and bedding. Remove the castings, but check for any worms that may still be there.
There are several advantages to worm castings. They contain five times the available nitrogen, several times the available potash, and 50 percent more calcium than six inches of good top soil. The nutrients in worm castings are water soluble, which means they are immediately available for plant intake. Castings hold two to three times their weight in water. They will not burn the root system, unlike fresh, raw manure.
Go Mobile